Thinking about retrofit? Start with these DIY wins
From draught proofing to loft insulation, discover which energy saving improvements you can confidently tackle yourself, and when it's worth calling in a professional.
Retrofitting your home doesn't have to start with a major renovation. Some of the most effective improvements are surprisingly affordable and can be completed by confident DIYers over a weekend.
Whether you're looking to make your home warmer, reduce energy bills or simply improve comfort, this guide explains which retrofit measures are suitable to do yourself, how difficult they are, and when it's worth getting professional advice.

Loft Insulation: A Simple Weekend Upgrade
⭐ DIY Difficulty: ★★★☆☆ (3/5)
Best for: Confident novice DIYers with safe access to their loft.
Professional help recommended if: Your loft has damp issues, spray foam, electrical complexity, difficult access, or you're insulating the roof rather than the loft floor.
Typical DIY saving: Hundreds of pounds compared to professional installation.
Payback: Often around 2 years, with insulation lasting 40+ years.
Around 25% of a home's heat can escape through an uninsulated roof. Adding loft insulation slows this heat loss, helping your home stay warmer for longer while reducing heating bills and reducing your carbon footprint.
Loft insulation is widely regarded as one of the most cost-effective energy efficiency improvements you can make. If you're considering improving your home's energy efficiency, loft insulation is often one of the simplest and most cost-effective places to start.
For many homes, yes. Adding mineral wool insulation between and across loft joists is well within the capabilities of many homeowners, provided the loft is dry, well ventilated and easy to access.
You should consider using a professional if:
- You are insulating the roof rather than the loft floor
- Your loft has signs of damp or timber decay
- Access is difficult or the roof has a very shallow pitch
- Electrical cables or equipment require alteration
- Spray foam or blown fibre insulation is being installed
- Your home has complex roof shapes or raised ceilings.
Keep this as a simple checklist:
✔ Loft is dry
✔ No signs of timber decay
✔ Good ventilation
✔ Safe access
✔ You know where electrical cables are
Key things to remember
- Don't block eaves ventilation.
- Aim for at least 270mm (or more where practical).
- Don't squash insulation under storage boards.
- Insulate and draught proof the loft hatch.
- Don’t cover high power electrical cables
- Use downlight covers
- Consider sealing obvious air leaks before adding insulation.
- Every loft is slightly different, so it's worth taking a few minutes to assess its condition before buying materials.
Many people worry they'll lose storage space after adding insulation.
Fortunately, you can have both.
If you're insulating the loft floor, raise the boarding above the insulation using:
- Timber battens
- Raised boarding systems designed for DIY
This prevents the insulation being compressed, which would reduce its effectiveness and could increase the risk of condensation.
DIY Difficulty Rating
★★★☆☆
Typical project time: Half to one day
Best insulation type for DIY: Blanket (mineral wool or sheep's wool)
Suitable for beginners? Yes, with safe loft access
Professional help needed? For spray foam, blown fibre, warm lofts, damp or complex roofs
Biggest benefit: Lower heating bills, warmer home and improved comfort
Draught Proofing: Quick Wins For A Cosier Home
⭐ DIY Difficulty: ★☆☆☆☆ (1/5)
Best for: Almost every homeowner or tenant with basic DIY skills.
Professional help recommended if: You're dealing with open chimneys, traditional buildings, damaged windows or doors, or you're unsure whether an opening is for ventilation or an unwanted draught.
Typical DIY cost: £10–£100 depending on the products used.
Payback: Often within the first heating season through improved comfort and lower heating bills.
Even homes with good insulation can feel cold if warm air is escaping through small gaps around doors, windows and floors. These unwanted air leaks (draughts) make your home feel colder, meaning you often turn the heating up to compensate.
Draught proofing is one of the cheapest and easiest retrofit measures you can carry out yourself. It helps to:
- Keep warm air inside your home.
- Stop cold air getting in.
- Improve comfort by reducing cold spots.
- Lower heating bills.
- Complement other retrofit measures such as loft or floor insulation.
It's an excellent first step if you're new to DIY energy improvements, giving you a quick way to improve comfort while building confidence for future projects.
For almost all homes, absolutely. Many draught proofing products are designed specifically for homeowners to install themselves and require little more than a tape measure, scissors and a screwdriver.
Most people can successfully:
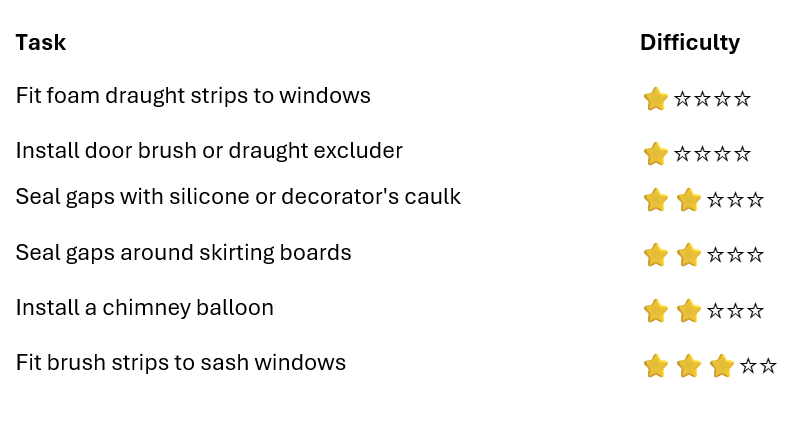
- Fit draught proofing strips.
- Seal small gaps with decorator's caulk or silicone.
- Install brush strips on doors.
- Fit chimney balloons.
- Add draught excluders.
- Seal skirting board gaps.
Professional help is only usually needed for more specialist work, such as chimney caps, repairing damaged windows or carrying out airtightness improvements as part of a whole-house retrofit.
Seal draughts, not ventilation. A draught is an unintended gap that lets cold air into your home. Ventilation is deliberate. It removes moisture and stale air, helping prevent condensation and mould.
Never block or seal:
- Air vents
- Extractor fans
- Boiler flues
- Combustion air vents
- Air bricks
If you're unsure whether an opening provides ventilation, leave it alone or seek advice before sealing it.
Remember, the aim is to stop unwanted draughts while keeping your home properly ventilated and healthy.
DIY Difficulty Rating
★☆☆☆☆
Typical project time: 1–4 hours
Best for beginners? Yes
Typical cost: £10–£100
Professional help needed? Rarely, except for specialist chimney or window work
Biggest benefit: Improved comfort, fewer cold draughts and lower heating bills
Underfloor Insulation: More Involved, But Worth Considering
⭐ DIY Difficulty: ★★★★☆ (4/5)
Best for: Confident DIYers with experience using tools and working in confined spaces.
Professional help recommended if: Your floor is solid concrete, access beneath the floor is difficult, or there are signs of damp, timber decay or structural issues.
Typical DIY saving: Hundreds of pounds compared to professional installation (where suitable).
Typical energy saving: Around £60 per year, with the added benefit of warmer, more comfortable floors.
Around 10% of a home's heat can be lost through the floor. If your ground floor feels cold underfoot, or you notice draughts around floorboards, underfloor insulation can make a noticeable difference.
Insulating beneath the floor helps to:
- Keep heat inside your home.
- Reduce cold floors and draughts.
- Improve comfort throughout the house.
- Lower heating bills.
- Complement loft insulation and draught proofing as part of a whole-house retrofit.
Underfloor insulation is one of the more challenging DIY retrofit projects, but in the right home it can make rooms feel noticeably warmer and more comfortable.
Sometimes, it depends on your floor type. If you have a suspended timber floor with good access underneath (for example via a cellar or crawl space), installing insulation between the floor joists is achievable for experienced DIYers.
However, it is considerably more demanding than loft insulation. You'll often be working in awkward positions, lifting floorboards or crawling beneath the floor while ensuring ventilation isn't blocked.
If your home has solid floors, this work is usually only worthwhile as part of a larger renovation project.
Check:
✔ What type of floor do you have?
✔ Is there any damp or timber decay?
✔ Are air bricks clear?
✔ Can you safely access beneath the floor?
Key things to remember
- Never block underfloor ventilation.
- Support insulation properly.
- Don't compress insulation.
- Repair any damp or structural issues first.
If you're unsure what type of floor you have, it's worth finding out before planning any insulation work, as this will determine whether the project is suitable for DIY.
DIY Difficulty Rating
★★★★☆
Typical project time: 1–3 days depending on access
Best for beginners? No, better suited to experienced DIYers
Suitable floor type: Suspended timber floors
Professional help needed? Usually for solid floors or difficult access
Biggest benefit: Warmer floors, fewer draughts and improved comfort
Not sure which DIY improvements are right for your home?
Every home is different. The age of your property, the way it was built and its current condition can all affect which DIY retrofit measures are suitable and where you'll see the biggest benefits.
If you're unsure where to start, or would like some independent advice before taking on a project, we're here to help.
Get free, impartial advice
If you'd like guidance on which DIY energy improvements are suitable for your home, complete our contact form and we'll arrange a free home visit.
During the visit, we'll help you:
- Identify which DIY retrofit measures are suitable for your property.
- Highlight any issues to address before you start.
- Explain where professional installation may be the better option.
- Answer your questions and help you plan your next steps.
Whether you're ready to start this weekend or simply exploring your options, we're happy to help you make informed decisions about improving your home.